Free Estimate
888-698-1958
Call for Priority Scheduling
888-698-1958
Call for Priority Scheduling
Book Online
Is it that you haven’t looked inside your home’s crawl space in a while? If so, it might be time to give it a thorough inspection. Especially if your floors are feeling cold even when your furnace is running! While your crawl space isn’t the most inviting place to visit, spotting damp, soggy fiberglass batts hanging from your floor joists (or no insulation at all) is a telltale sign that your crawl space needs to be addressed to ensure adequate insulation and minimal moisture.
This guide will walk you through the best steps to take when re-configuring your crawl space. Also, we will discuss the downfall of traditional crawl space insulation methods, along with the more modern and efficient crawl space encapsulation processes. Let's look at how you can apply them to your home.
For many homes with crawl spaces, it is common for builders to place fiberglass insulation in the subfloor above the crawl space while leaving wall vents open. The thought behind this is that any moisture build-up in the crawl space would be expelled out of the vents.
Unfortunately, this old-school design does not live up to its intended purpose. Homes draw in air from all sides at the lower levels. This air then travels upward into the home and out through the attic or roof. Outside air is sucked through vents and small gaps and into the crawl space. If this air has higher levels of humidity in it, and comes into contact with the cool surfaces in the crawl space, it creates condensation. Condensation can lead to insulation degradation, wood rot, mold growth, and energy inefficiency.
Rather than taking the traditional approach to crawl space insulation, the most effective way to ensure your crawl space stays condensation-free and insulated all year long is to enclose it entirely. This should be done regardless of the climate you live in. Not only does crawl space encapsulation reduce the chance of moisture build-up and promote better energy efficiency, it also provides a complete solution for crawl space mold and pest prevention. Moreover, it creates an overall cleaner crawl space in your home that you could use for additional storage.
Below, we’ve detailed four steps you can take to encapsulate your home’s crawl space.
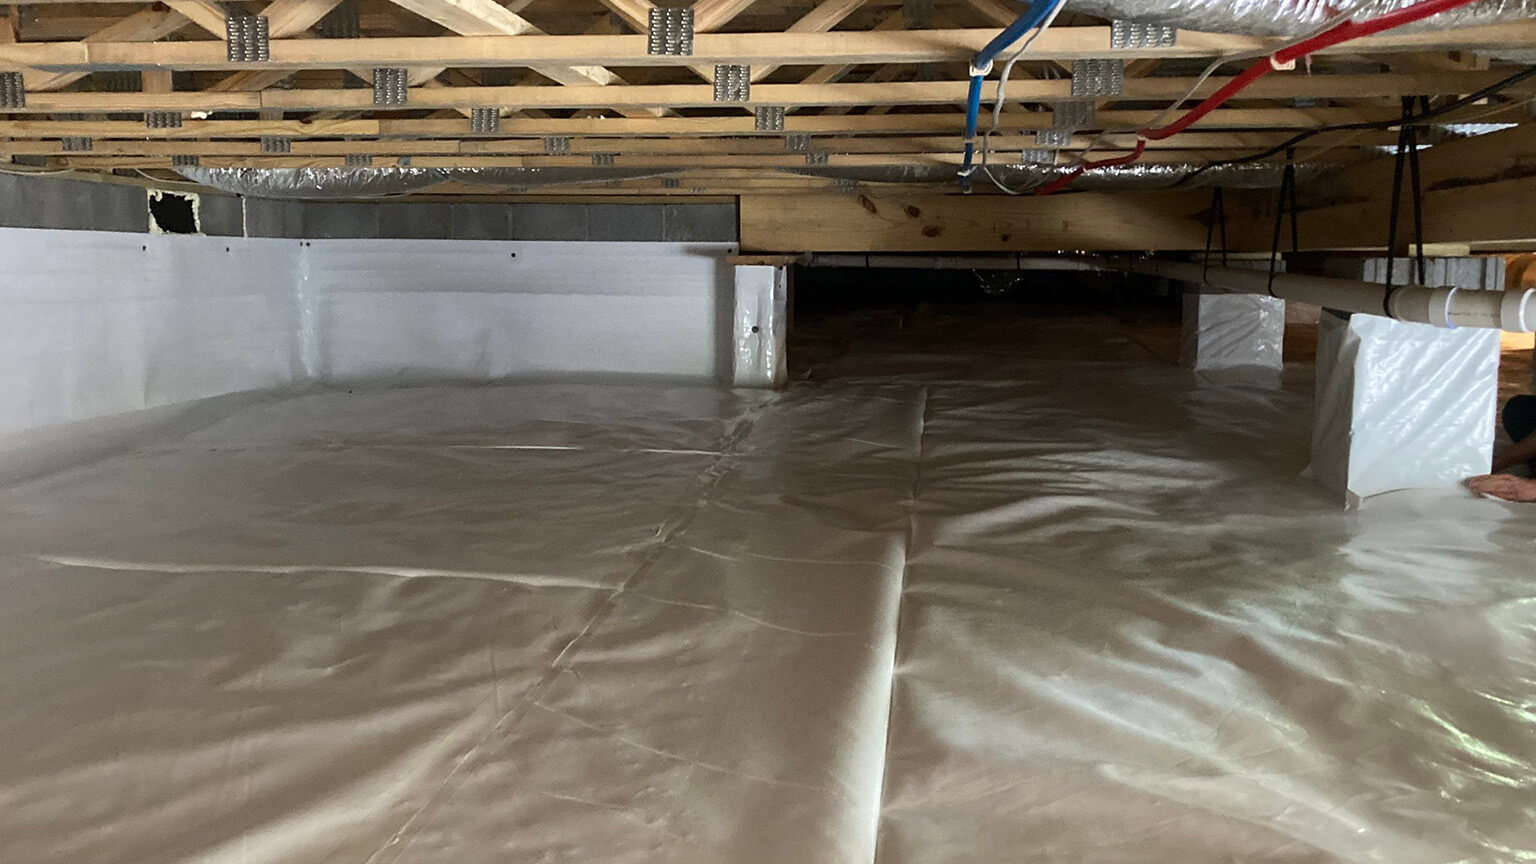
One of the best ways to insulate a crawl space is to encapsulate it along with insulation. Encapsulation eliminates outside air and moisture from entering the crawl space as humidity.
If your crawl space has standing water, an interior drain system with a sump pump and an industrial-strength dehumidifier might be necessary to completely dry out the space before the encapsulation process can begin.
Once you have eliminated potential water sources and completely dried out your crawl space, the next step in the encapsulation process is to seal crawl space vents, airways, or access doors. Many manufactured crawl space vent covers help to create an airtight bond—but if you happen to create your own DIY vent covers, be sure to use non-organic materials and caulk them in place to keep moisture out.
Then, using a foam sealant, seal off any gaps, airways, or cracks—including between plumbing, drain line, or wiring routes—that remain in your crawl space. For access doors, be sure to install heavy-duty weatherstripping around their frames to keep air from flowing into your crawl space.
Rather than installing batts between your subfloor’s joists (paper-backed batt insulation in a crawl space with high humidity can become food for mold, especially if it is hanging), the encapsulation process utilizes rolled foam insulation across your crawl space’s walls. Unlike fiberglass batts, these types of insulation resist damage caused by moisture, and deliver more thermal resistance than many other insulating materials of the same thickness.
Be sure to select insulation with the appropriate R-value (the measurement used to determine thermal resistance) for your area and climate. Before applying your insulation, read through any manufacturer specifications or installation guides, as each type of insulation features its own installation process.
With your insulation in place, it’s time to add a vapor barrier over the floor and walls of your crawl space. This prevents moisture from entering up from the floor or through porous concrete walls as moisture vapor. Removing moisture makes your crawl space healthier and more energy efficient. This now dry, clean, and usable space, has the potential to become an additional storage area in your home.
Vapor barriers are available in a wide range of thicknesses. However, you need to be sure to choose one that will, at minimum, withstand rips and tears—especially if your HVAC, ducting, or other appliances are housed in your crawl space. UV protection is also extremely important so the plastic liner doesn't become brittle and fall apart. Many lower end, thinner vapor barriers do not have UV protection.
Encapsulating your crawl space on your own can be a time-consuming and challenging process, especially if you’re also dealing with moisture or mold problems. Fortunately, at ‘58 Foundations & Waterproofing, we can help you solve your crawl space issues for good.
If you’re dealing with severe moisture issues or standing water in your crawl space, our basement waterproofing solution—which includes encapsulation, dehumidifier, and sump pump options—will work to keep your crawl space dry and free of mold. Additionally, our heavy-duty commercial crawl space dehumidifier will work to dry out any moisture collected in your joists, subflooring, posts, and other porous materials, stopping further rot and mold growth.
If you’re looking to install a permanent crawl space solution, call ‘58 Foundations & Waterproofing today to schedule your free inspection.


We respect your privacy. By submitting, you authorize '58 Foundations and Waterproofing to reach you via call, email or text for information about your project needs. We will never share your personal information with third parties for marketing purposes. You can opt out at any time. Message/data rates may apply. Consent is not a condition of purchase. Privacy Policy