Free Estimate
888-698-1958
Call for Priority Scheduling
888-698-1958
Call for Priority Scheduling
Book Online
So, you’ve decided to have your basement waterproofed and equipped to keep water out and away from your home. But along with having drainage channels in place to guide water to a collection site, now you’ll need to install a sump pump to get that collected water moving out and off your premises. Let’s take a dive into how to prepare for and how to install a sump pump in your basement!
To prepare yourself, make sure you have the following tools to complete the job: an electric drill, a hammer, a pipe cutter, and drill bits. You may also want to have a sledgehammer on hand, just in case. Then will come the need for materials. You’ll need the following materials to ensure that your sump pump is properly placed and installed…
Now that you’re properly equipped and have the right supplies, let’s get to putting together your sump pump!
Your sump pump will need to be powered, and so should be located near a GFCI (Ground Fault Interrupter Outlet). But if you can’t find a suitable place that’s near an outlet, consult with a certified electrician to have an outlet installed. Once that’s been taken care of, you now have the general site for your sump pump.
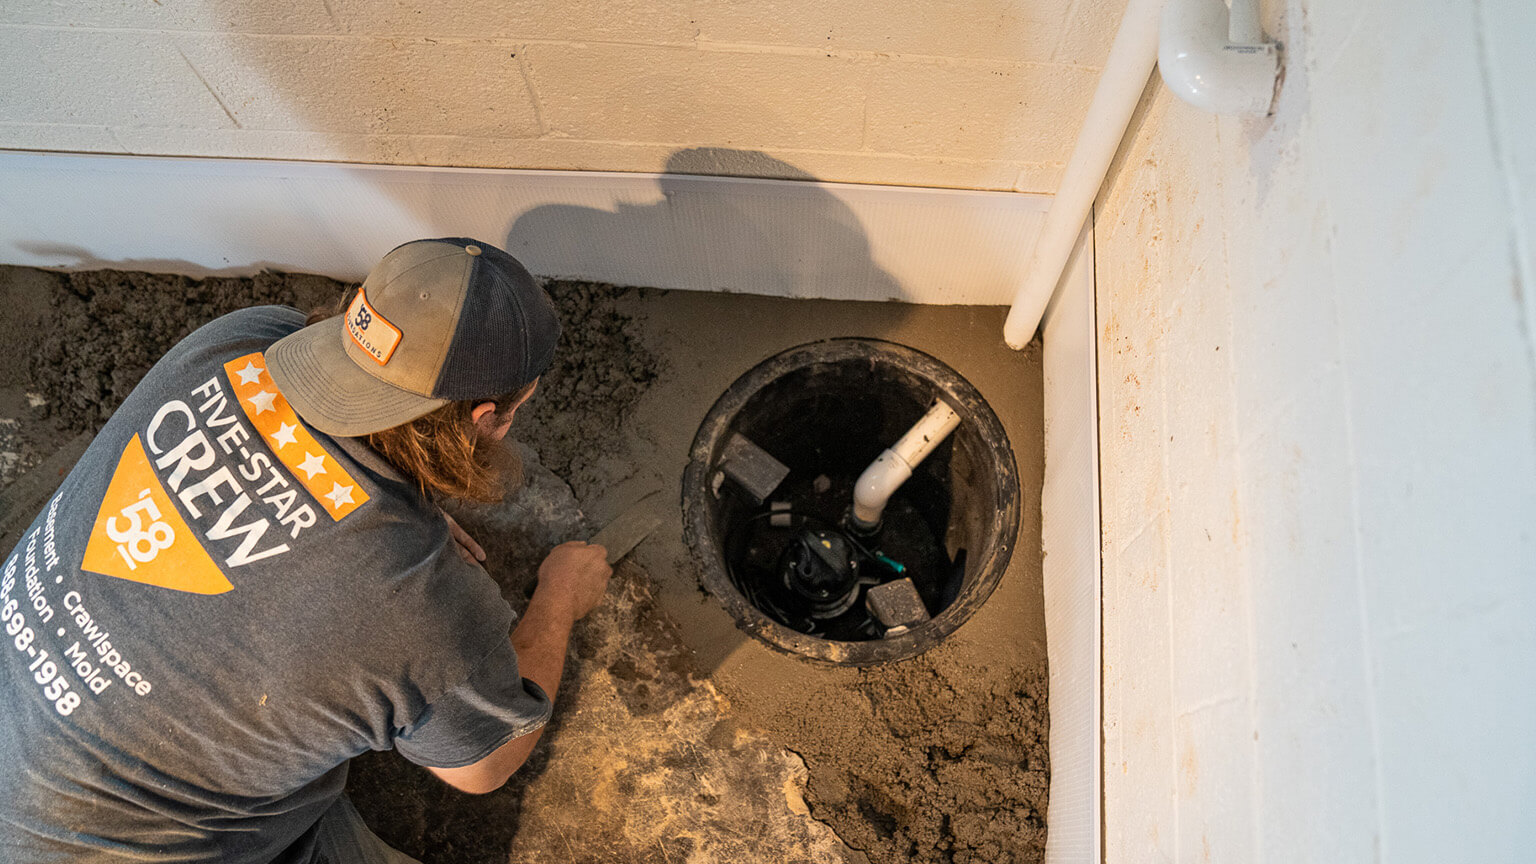
Next, you’ll want to dig out your sump pit. This is where water will be collecting, and the sump pump will begin moving that water out. Based on the measurements of your sump pump, dig a hole that is six inches deeper and 10 inches wider than the sump pump.
Add around 2 to 3 inches of gravel to the bottom of the sump pit you’ve made before topping it with a fieldstone to provide a stable platform for the sump pump to sit. Alternatively, you could fill in more gravel until it leaves one or two inches of the sump pump exposed. One way or another, this will ensure that your sump pump remains stable.
You’ll now need to attach the male adapter to the PVC discharge pipe before fitting it into the female adapter of the sump pump. You’ll want to make a hole about six inches above the pump in the discharge pipe, using a ¼ inch drill—this is to create a weep hole, so that water can flow back into the pump when it turns off. This will keep it primed and ready for operation.
With the wire ties, attach the sump pump’s electrical cord to the discharge pipe. On the open end of the discharge pipe, install your check valve. Make sure the sump pump, the discharge pipe, and the check valve are all installed and secure before moving onto the next step.
With the pressurized fittings you have and PVC pipes, set up your channels so that they will guide the water to the exit point out of your home. Use the J Hooks to help support the PVC pipes and hold them up.
Now is time to make a hole in the wall for your PVC pipe to go out of the house. This is where a hammer may be necessary. Make sure the pipe continues going at least four feet away from the house.
Once you have the PVC pipe going through the hole in the wall, use silicone sealant to seal the hole around the pipe. This will secure the pipe and keep your lower level safe from outside air and debris coming in.
At the end of the PVC pipe, attach an increaser to spread out the water flow. Then, attach a corrugated pipe to the end of the PVC pipe to further guide the water out and disperse it away from your home. Be sure to add gravel around the corrugated pipe to keep it stable and in place.
It’s time to plug in your sump pump and place a cover over your sump pit. Now you have a presentable and fully functioning sump pump that’s ready to keep that groundwater out of your lower level and safely away from your home!
Now that you know how to install a sump pump system, if you would prefer to have an expert help, you can always count on the experienced professionals at ’58 Foundations & Waterproofing! Most waterproofing solutions aren’t designed to last for a very long time. But with over 64 years of experience, ’58 Foundations & Waterproofing can provide the waterproofing solution your basement or crawlspace needs—one that’ll work effectively and last for years on end! From our Channel ’58 drainage channels to our Workhorse sump pumps with battery backup options, you can rest assured that ’58 has the guaranteed results you need to regain the peace of mind that you deserve. You can enjoy your basement or crawlspace without the worry of when there’s a heavy rain coming through
Along with basement and crawlspace waterproofing, ’58 Foundations & Waterproofing also offers its expertise in foundation repair, crawlspace encapsulation, and mold removal. No matter how water and moisture is affecting your foundation and lower level, we can help you find a comprehensive solution to your problem.
We have local offices all throughout the Eastern Seaboard! Whether you live near Marietta, GA, Chattanooga, TN, Winston-Salem, NC, or Baltimore, MD, there’s a ’58 team of experts to help you!
Give us a call today to schedule for a free sump pump inspection and a detailed estimate!


We respect your privacy. By submitting, you authorize '58 Foundations and Waterproofing to reach you via call, email or text for information about your project needs. We will never share your personal information with third parties for marketing purposes. You can opt out at any time. Message/data rates may apply. Consent is not a condition of purchase. Privacy Policy